

Recently, while working on my engine, I decided I should pack all my rasterized font bitmaps into one big texture rather than uploading all these individual characters bitmaps to the GPU. I figured it would be easy, I’d just search around for an algorithm to do this, implement it and move on. Turns out though, this is not such a trivial problem, and there’s a huge wealth of literature on the topic. So here I am several weeks later, still not quite finished texture packing my fonts after having explored several algorithms and learned a great deal about something probably not that important. What I came away with though was an appreciation for how sometimes the simplest option is a much better option that you might care to admit.
Before we get stuck into the details lets just take a moment to get everyone on the same page as to what a rectangle packing algorithm is. More generally, “packing” problems are a set of problems related to fitting shapes into some kind of container. In game development, we’re used to 2D packing problems, and more specifically the rectangle packing problem, where you have some set of rectangles of different dimensions and you need to fit them into a containing rectangle.
The tricky thing is, this is what’s called an NP-hard (non-deterministic polynomial) problem. I don’t understand computational complexity enough to define that in detail, but suffice to say it’s extremely difficult and does not have a “perfect” solution. As a result, there are countless different algorithms that “solve” the problem to some degree, but all have tradeoffs and issues. Thus you have to pick what suits your needs, which is what we’ll attempt to do here. Note I’m only going to explore a few packing algorithms I found in my research, but there truly are endless amounts of these.
Not knowing anything, I started this adventure by attempting to understand a rectangle packing library called stb_rect_pack, it’s public domain, easy to use and I figured would be a great place for me to start learning.
The comments in the code talk of using an algorithm called Skyline Bottom-Left. Some quick googling brought me to this paper which immediately made me scared of what I’d got myself into. I persevered and read through the code not understanding what was going on.
This bit of code led me to understand there is some kind of linked list, but I couldn’t easily see what it was doing or representing.
node = c->active_head;
prev = &c->active_head;
while (node->x + width <= c->width) {
  int y,waste;
  y = stbrp__skyline_find_min_y(c, node, node->x, width, &waste);
  if (c->heuristic == STBRP_HEURISTIC_Skyline_BL_sortHeight) { // actually just want to test BL
     // bottom left
     if (y < best_y) {
        best_y = y;
        best = prev;
     }
  } else {
     // best-fit
     if (y + height <= c->height) {
        // can only use it if it first vertically
        if (y < best_y || (y == best_y && waste < best_waste)) {
           best_y = y;
           best_waste = waste;
           best = prev;
        }
     }
  }
  prev = &node->next;
  node = node->next;
}
I thought alright, let’s visualize this. I’ll print out the packed rectangles and the state of the linked list, and see what’s going on.
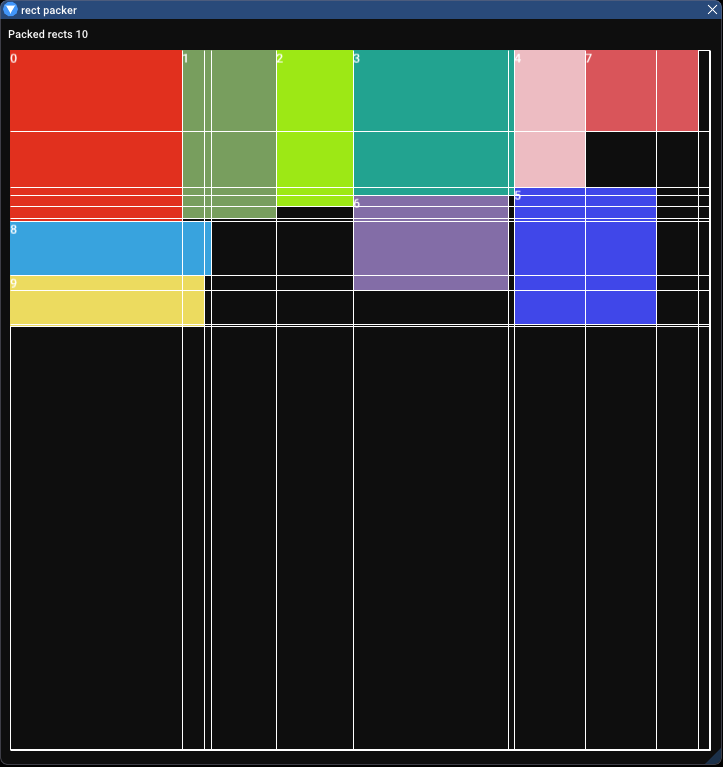
This lead me to seeing this:
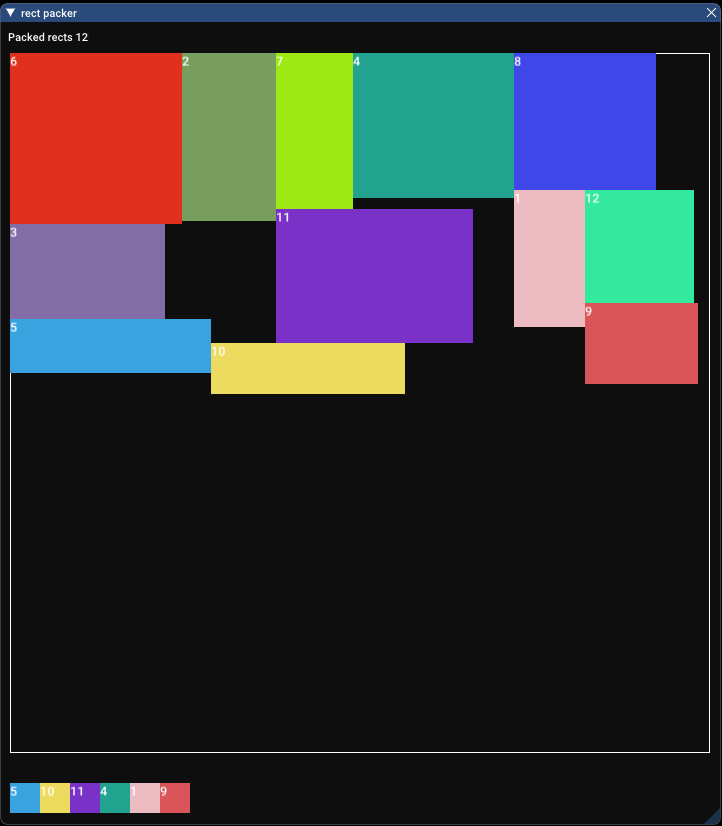
Each rectangle has been given an ID, which you can see, and the nodes have been given the same ID as the rectangle they correspond to. After staring at this for a while I realised that the linked list represents the bottom edge of the image. If you read the layout from left to right, reading the IDs of the rectangles you get the order of the linked list.
What this algorithm appears to be doing is looping through all these open nodes along the “skyline” (our skyline is upside down because I chose coordinates with flipped Y) trying to fit a rectangle spanning one or more of them. When it finds a place to put its rectangle, it needs to find all the nodes underneath that new skyline level made by the rectangle, and remove, or shrink them.
I’ll demonstrate with a drawing,

When I worked this out I felt confident I could easily do better than that. It’s leaving all this wasted space as it moves along! No way that’s optimal. Of course, this was some supreme arrogance on my part, and I was proved wrong quite quickly. Again we’ll come to that later.
Before I started trying other algorithms I decided it was necessary to have a metric by which I could compare different attempts against the reference (stb_rect_pack). I made two metrics, first a packing ratio. This is calculated by taking the sum of the areas of all the packed rectangles and dividing it by the area of the containing square. The containing square is defined by taking the furthest extents of the Y and X axes. The second metric is just the time taken to pack all the rectangles so we can evaluate performance.
I filled up my rectangle as much as I could like so:
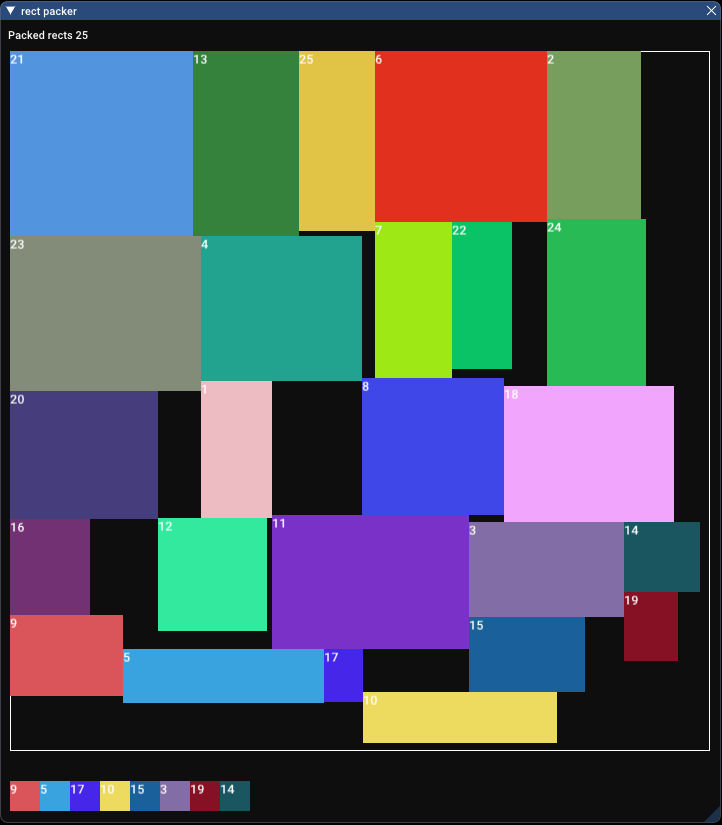
And got a packing ratio of 80.6% and time taken as 0.138 milliseconds.
Just to get us moving, let’s go with the most naive and simple solution to start with. It’ll be bad, but at least we have a starting point for improving things, and another reference point for our improvements.
I decided the most naive thing I could do was to go from left to right, packing rectangles in rows. If we sort the rectangles by height, then we should get neat rows, getting smaller and smaller as we go.
Straight forward to implement, here it is!
struct Rect
{
  int x, y;
  int w, h;
  bool wasPacked = false;
};

void PackRectsNaiveRows(std::vector<Rect>& rects)
{
  // Sort by a heuristic
  std::sort(rects.begin(), rects.end(), SortByHeight());

  int xPos = 0;
  int yPos = 0;
  int largestHThisRow = 0;

  // Loop over all the rectangles
  for (Rect& rect : rects)
  {
    // If this rectangle will go past the width of the image
    // Then loop around to next row, using the largest height from the previous row
    if ((xPos + rect.w) > 700)
    {
      yPos += largestHThisRow;
      xPos = 0;
      largestHThisRow = 0;
    }

    // If we go off the bottom edge of the image, then we've failed
    if ((yPos + rect.h) > 700)
      break;

    // This is the position of the rectangle
    rect.x = xPos;
    rect.y = yPos;

    // Move along to the next spot in the row
    xPos += rect.w;

    // Just saving the largest height in the new row
    if (rect.h > largestHThisRow)
      largestHThisRow = rect.h;

    // Success!
    rect.wasPacked = true;
  }
}
It’s ridiculously simple, but as I said, just a starting point. So how does this look?
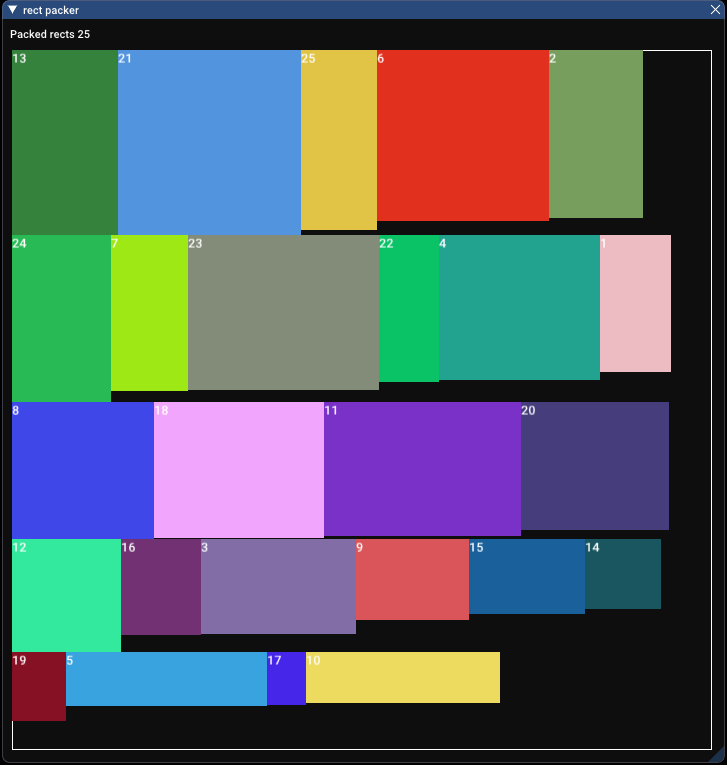
That looks quite good. Let’s take a look at our metrics. The above image has a packing ratio of 87.0% and a time taken of 0.116 milliseconds. Huh, it’s…. better?
At this point, I was alarmed. Sure I thought I could do better than skyline bottom-left, but not with the most naive implementation. This was supposed to be a starting point, it wasn’t supposed to be better from the get-go. I thought about this a bit more and wondered if there was a bias in my testing that was causing this naive algorithm to be better.
One of my first ideas centred around the idea that skyline bottom-left performs better when there are much more rectangles since it’s struggling to place these giant rectangles inside my test area. So let’s give that a go.
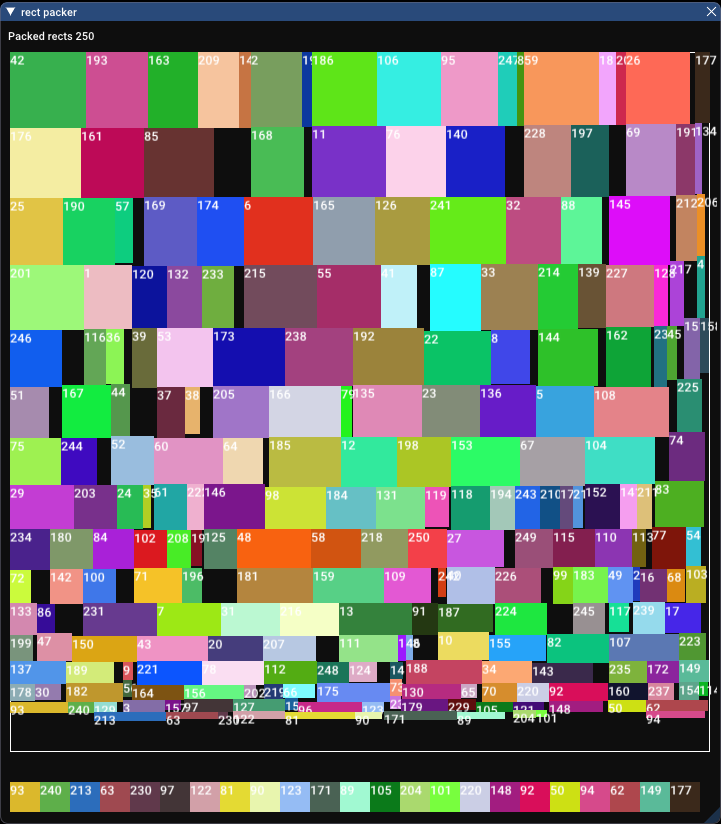
Ah, that’s better. So it’s got a packing ratio of 92.8% and it took 0.579 milliseconds. It’s worth pointing out at this point that my rectangle set is being randomly generated with uniform distribution on width and height. This will become important a little bit later.
Presumably, this is much better than my naive algorithm on the same set of rectangles. Let’s take a look.
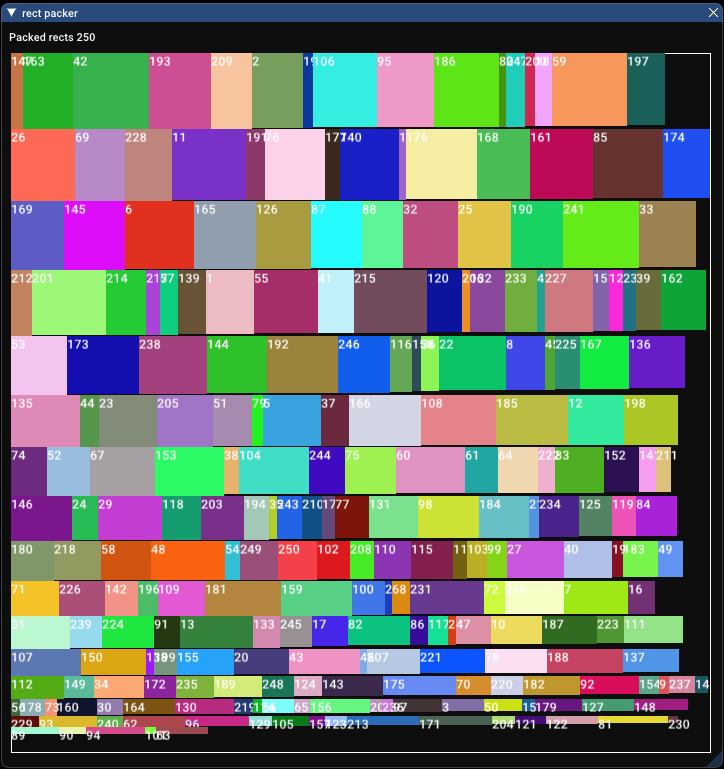
It looks pretty tight, and it’s packing ratio is 91.3%, while it took 0.239 milliseconds, so it’s very good! Not quite as tightly packed probably due to the far right edge, but it’s faster.
At this point in the process, I realised this article was going to take a different direction than I’d expected, but in the interest of actually continuing with the content I’d planned, I ventured on, attempting to make an even better algorithm.
Ignoring the unexpected success of the row packing algorithm, I figured the most obvious improvement was going to be manually scanning the entire image for a suitable location for every rectangle I wanted to pack. Yes, it will be slower, but that’s fine we can look at improvements later on. This is still extremely naive in terms of the actual packing logic, but let’s see how it works.
struct Rect
{
  int x, y;
  int w, h;
  bool wasPacked = false;
};

void PackRectsBLPixels(std::vector<Rect>& rects)
{
  // Sort by a heuristic
  std::sort(rects.begin(), rects.end(), SortByHeight());

  // Maintain a grid of bools, telling us whether each pixel has got a rect on it
  std::vector<std::vector<bool>> image;
  image.resize(700);
  for (int i=0; i< 700; i++)
  {
    image[i].resize(700, false);
  }

  for (Rect& rect : rects)
  {
    // Loop over X and Y pixels
    bool done = false;
    for( int y = 0; y < 700 && !done; y++)
    {
      for( int x = 0; x < 700 && !done; x++)
      {
        // Make sure this rectangle doesn't go over the edge of the boundary
        if ((y + rect.h) >= 700 || (x + rect.w) >= 700)
          continue;

        // For every coordinate, check top left and bottom right
        if (!image[y][x] && !image[y + rect.h][x + rect.w])
        {
          // Corners of image are free
          // If valid, check all pixels inside that rect
          bool valid = true;
          for (int ix = x; ix < x + rect.w; ix++)
          {
            for (int iy = y; iy < y + rect.h; iy++)
            {
              if (image[iy][ix])
              {
                valid = false;
                break;
              }
            }
          }

          // If all good, we've found a location
          if (valid)
          {
            rect.x = x;
            rect.y = y;
            done = true;

            // Set the used pixels to true so we don't overlap them
            for (int ix = x; ix < x + rect.w; ix++)
            {
              for (int iy = y; iy < y + rect.h; iy++)
              {
                image[iy][ix] = true;
              }
            }

            rect.was_packed = true;
          }
        }
      }
    }
  }
}
At its core, this algorithm needs to maintain a huge grid which is effectively a black and white image. And yes I know a vector of vectors is not the most efficient way of doing this, but we’re doing experiments here, no need to go too hard just yet.
std::vector<std::vector<bool>> image;
image.resize(700);
for (int i=0; i< 700; i++)
{
  image[i].resize(700, false);
}
This just stores a value for every pixel that lets us look up whether a rectangle has been placed over that pixel.
We then loop over all our rectangles, and for each one go through every pixel and check if the top left and bottom right of the rectangle (some other pixel) will fit at that location. We also check if this rectangle will go outside the boundary as an extra little edge case.
for (Rect& rect : rects)
{
  // Loop over X and Y pixels
  bool done = false;
  for( int y = 0; y < 700 && !done; y++)
  {
    for( int x = 0; x < 700 && !done; x++)
    {
      // Make sure this rectangle doesn't go over the edge of the boundary
      if ((y + rect.h) >= 700 || (x + rect.w) >= 700)
        continue;

      // For every coordinate, check top left and bottom right
      if (!image[y][x] && !image[y + rect.h][x + rect.w])
      {
        // Found a location!
      }
    }
  }
}
Following that, we check all the pixels inside that rectangle to make sure we don’t overlap some that aren’t using the corner pixels.
bool valid = true;
for (int ix = x; ix < x + rect.w; ix++)
{
  for (int iy = y; iy < y + rect.h; iy++)
  {
    if (image[iy][ix])
    {
      valid = false;
      break;
    }
  }
}
Once that’s succeeded we now know we’ve found a valid location. We then store that location in the rectangle and set all those pixels in the image as occupied.
if (valid)
{
  rect.x = (USHORT)x;
  rect.y = (USHORT)y;
  done = true;

  for (int ix = x; ix < x + rect.w; ix++)
  {
    for (int iy = y; iy < y + rect.h; iy++)
    {
      image[iy][ix] = true;
    }
  }

  rect.was_packed = true;
}
Let’s give that a test, first with few rectangles.
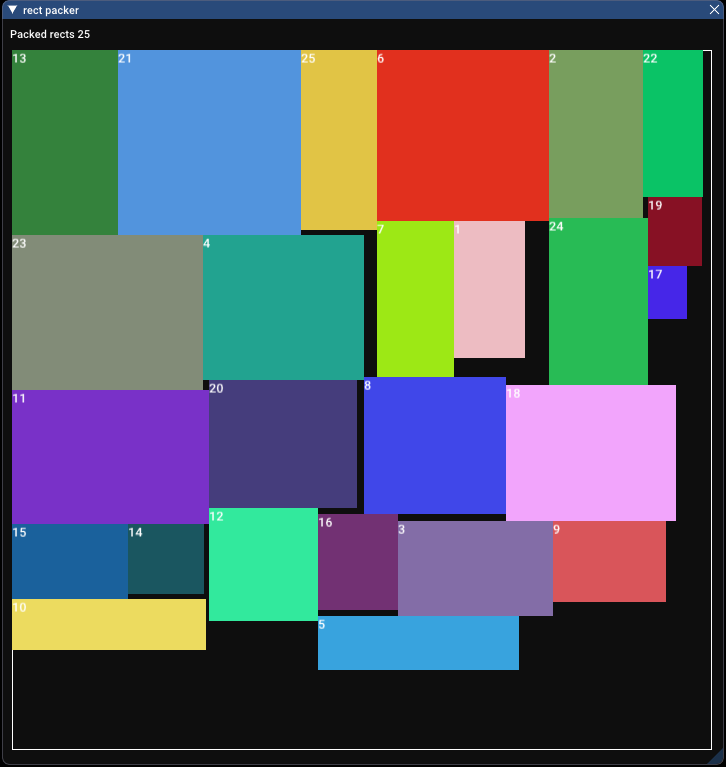
Packing ratio of 89.9%! For only 25 rectangles that outmatches both of our previous algorithms, which scored 80.6% for skyline bottom-left and 87.0% for row packing. Here’s where it goes wrong though. Packing just 25 rectangles took 4137.732 milliseconds. Yes, over 4 whole seconds. That’s orders of magnitude worse than before.
After doing some profiling I realised that’s there’s nothing particularly wrong, it’s just repeatedly scanning individual pixels over and over again. The obvious and quick fix was to reduce the number of checked pixels. When scanning inside the rectangle we don’t need to check every pixel, how about we check every 5 or so pixels in X and Y? That brings us down to 278.183 milliseconds. For no difference whatsoever in packing ratio. We can leave that as a variable to tweak then. Maybe we can set the number of pixels to skip based on the smallest rectangle in the set.
Let’s try with lots of rectangles now.
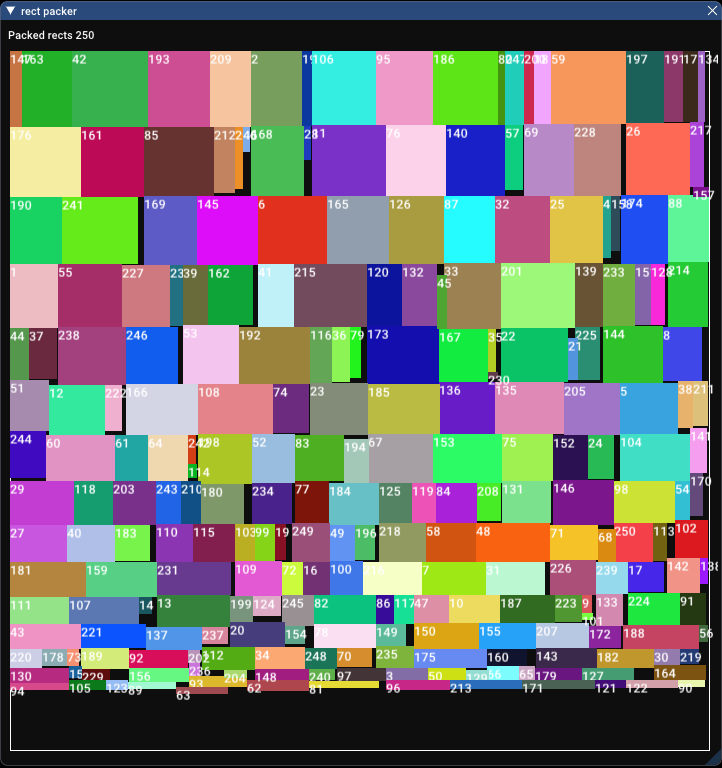
Wow, that is very tight. It’s nice to see how it’s gone back and packed smaller little rectangles in the holes it left from packing bigger rectangles. With a packing ratio of 96.7%, this is our tightest packer yet, and honestly, it’s going to get extremely hard to get any tighter than that. How long did it take? 1373.997 milliseconds. Interestingly that it did not become tenfold slower even when we added 10 times the number of rectangles. That’s at least a nice property.
Before I moved on to other packing algorithms, I decided to try out different sorting methods. You’ll notice that all three algorithms so far have been sorting by height before doing any kind of packing. This was the default in stb_rect_pack, and I’ve pretty much left it. But I wanted to see if using a different sorting method would give us different results for pixel scanning. In the interest of keeping this article smaller, I won’t go and try different sorting methods on the row packer. Since it packs in rows based on height, any other sorting method causes it to completely fail.
There are 4 obvious sorting methods (leaving out more exotic methods):
We’ve already seen sort by height, let’s see what the others do:
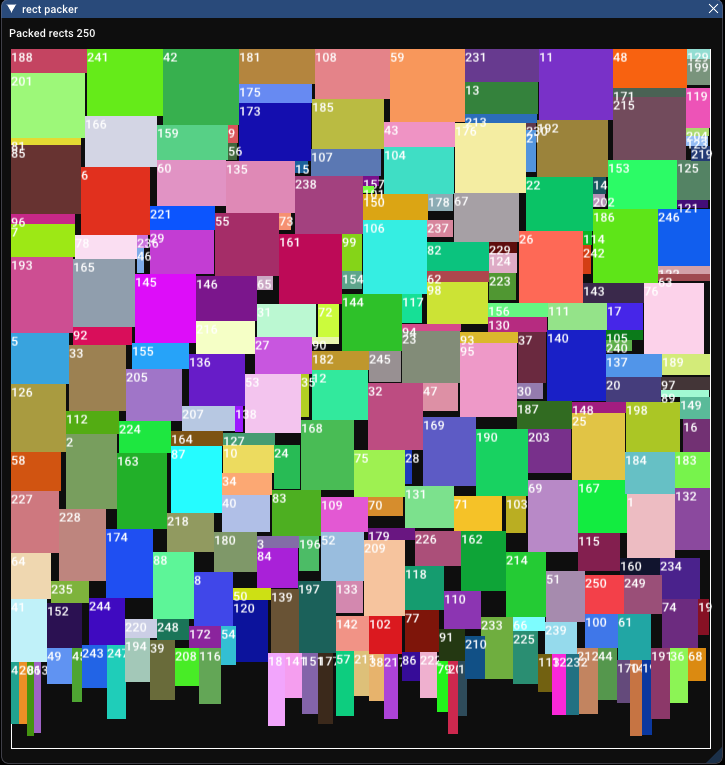
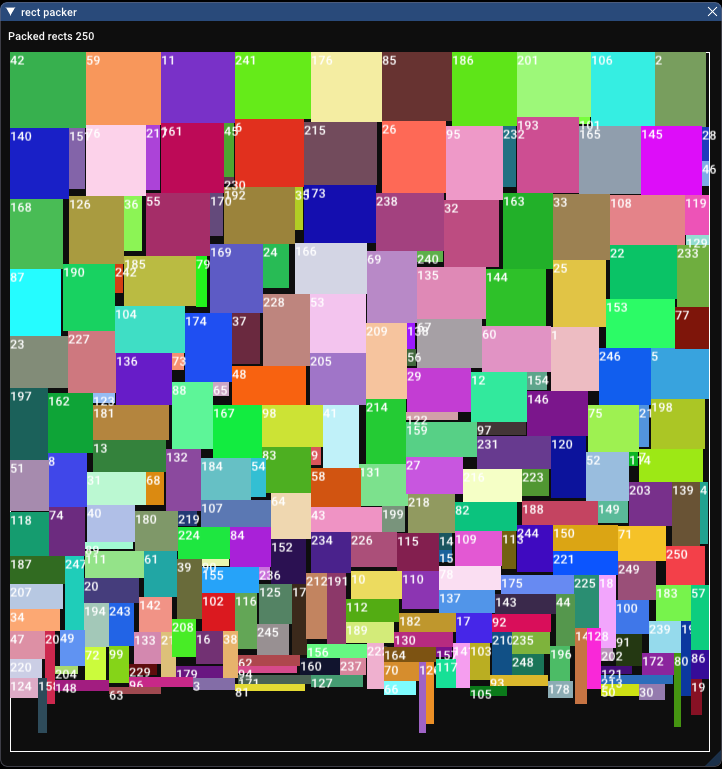
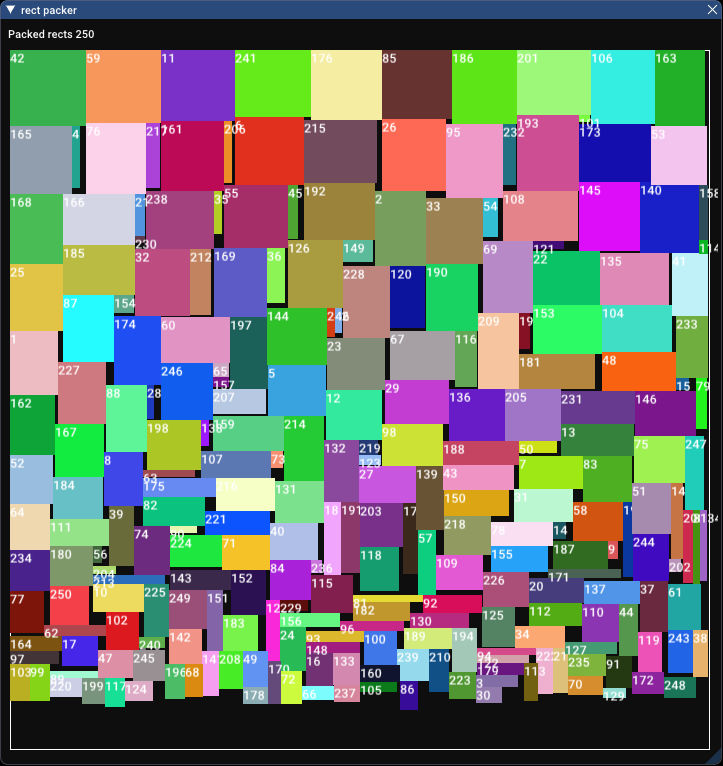
Evidently, sorting by height is best. It seems that sorting by width leaves all these irregular tall rectangles near the bottom. This similarly occurs with area, not as much, but enough to ruin the packing ratio. Perimeter was surprisingly good, I guess because small, regularly shaped rectangles ended up being packed near the end, and got to squeeze into holes.
Where do we go from here then? The pixel scanner is by far the best, but it’s very slow, so maybe if we can find a way to make it fast, then we’re done. What makes this slow is having to scan every pixel repeatedly. What if we could just pretend large areas of the image are a single pixel and check them at once?
Inspired by this article on code project, the idea here is that we’ll represent our container by a dynamic grid. Each cell has a location, size and boolean telling you if it’s occupied. At first, it’s got a single cell, representing the entire area. As we add rectangles, we’ll split the grid along the edges of the rectangle. The first rectangle we place will create 4 cells like so, with one occupied by our new rectangle.
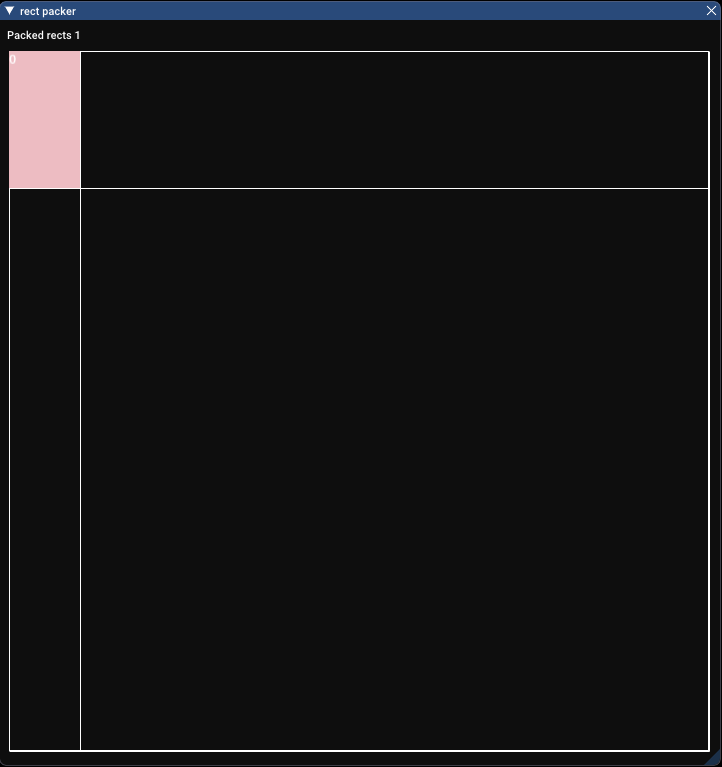
If we now pack two rectangles you can see the grid gets split again:
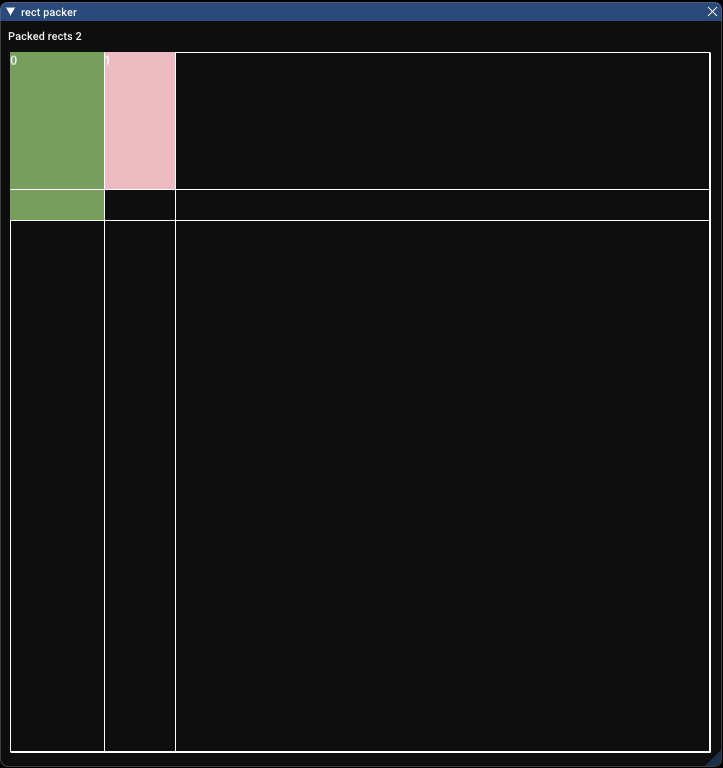
Each grid cell is treated as a pixel, so instead of scanning the whole image we just check the grid cells, and all their neighbouring cells to see if we can fit a rectangle in any particular place.
Implementing this behaviour I must admit was not trivial. This is where things start to get into over-engineered territory. It took me several days of frustration to get this algorithm to work nicely. This is pretty much how it works though.
Firstly, our dynamic grid is represented with an array of booleans, and another two arrays containing the row and width sizes.
struct DynamicGrid
{
  // Access the value of one of the cells to see if it's occupied
  // Note how we have to use a layer of indirection to get the index of the data
  bool Get(int x, int y)
  {
    int rowIndex = rows[y].index;
    int columnIndex = columns[x].index;
    return data[GetDataLocation(columnIndex, rowIndex)];
  }

  // Set the value at a specific location
  void Set(int x, int y, bool val)
  {
    int rowIndex = rows[y].index;
    int columnIndex = columns[x].index;
    data[GetDataLocation(columnIndex, rowIndex)] = val;
  }

  // Just a helper as we're treating a 1D array as a 2D array
  inline int GetDataLocation(int x, int y)
  {
    return gridSize * y + x;
  }

  inline int GetRowHeight(int y)
  {
    return rows[y].size;
  }

  inline int GetColumnWidth(int x)
  {
    return columns[x].size;
  }

  // We predetermine a grid size that's at least big enough for the number of rectangles we'll fit in per row, can be tuned for memory savings
  const gridSize = 400;
  std::vector<bool> data;
  struct Dimension
  {
    int size;
    int index;
  };
  std::vector<Dimension> rows;
  std::vector<Dimension> columns;
};
You’ll note that the “dimensions”, row or height values store an index. This is a layer of indirection because when we insert a new row or column, we’ll do so at the end of the data array, rather than in the middle, saving us the effort of having to move a bunch of data. We store this index to the correct location in the data array and use it when we want to access data.
When we set up the grid, we just reserve some memory, and then give ourselves an initial row and column, representing the entire image.
struct DynamicGrid
{
  void Init(int width, int height)
  {
    data.resize(gridSize * gridSize, false);

    rows.reserve(gridSize);
    rows.push_back({width, 0});

    columns.reserve(gridSize);
    columns.push_back({height, 0});
  }
}
Inserting rows and columns is where it gets interesting. First, we want to copy the data from the row/column we’re splitting and put it at the end of the data array. Then we want to insert a new row/column in the appropriate place in their vectors, doing a subtraction to work out the size of the new element, and also give it the index relevant to where we’ve put the data.
void InsertRow(int atY, int oldRowHeight)
{
  // Copy the row atY to the end of data (add a new row)
  int rowIndex = rows[atY].index;
  for (int i = 0; i < columns.size(); i++)
  {
    data[GetDataLocation(i, (int)rows.size())] = data[GetDataLocation(i, rowIndex)];
  }

  Dimension old = rows[atY];

  // Insert a new element into "rows"
  // the index of the new element to the end of the data array
  rows.insert(rows.begin() + atY, Dimension{old.size - oldRowHeight, (int)rows.size()});

  // Set the size of the old row to the appropriate height
  rows[atY+1].size = oldRowHeight;

}

void InsertColumn(int atX, int oldRowWidth)
{
  // Copy the column atX to the end of data (add a new column)
  int columnIndex = columns[atX].index;
  for (int i = 0; i < rows.size(); i++)
  {
    data[GetDataLocation((int)columns.size(), i)] = data[GetDataLocation(columnIndex, i)];
  }

  Dimension old = columns[atX];

  // Insert a new element into "columns"
  // the index of the new element to the end of the data array
  columns.insert(columns.begin() + atX, Dimension{old.size - oldRowWidth, (int)columns.size()});

  // Set the size of the old column to the appropriate height
  columns[atX+1].size = oldRowWidth;

}
Now here’s the actual algorithm in all it’s glory, with one missing piece, the “CanBePlaced” function, which I’ll get back to in a second. This is functionally quite similar to the pixel scanning algorithm. We’re just looping over all the cells, finding out if a rectangle will fit. If it will, then we need to work out what cells we need to split, and of course, split them.
struct Rect
{
  int x, y;
  int w, h;
  bool wasPacked = false;
};

void PackRectsGridSplitter(std::vector<Rect>& rects)
{
  // Sort by a heuristic
  std::sort(rects.begin(), rects.end(), SortByHeight());

  DynamicGrid grid;
  grid.Init(700, 700);

  for (stbrp_rect& rect : rects)
  {
    // Search through nodes looking for space

    bool done = false;
    int yPos = 0; // We need to remember where we are in the image
    for (int y = 0; y < grid.rows.size() && !done; y++)
    {
      int xPos = 0;
      for (int x = 0; x < grid.columns.size() && !done; x++)
      {

        // CanBePlaced will tell us if we can put a rectangle here, and if so it'll tell
        // us how many nodes we need to fit the rectangle, and how much leftover space
        // there will be in the rectangles we have to split.
        Vec2i leftOverSize;
        Vec2i requiredNodes;
        if (CanBePlaced(grid, Vec2i(x, y), Vec2i(rect.w, rect.h), requiredNodes, leftOverSize))
        {
          // Successfully found a location
          done = true;
          rect.x = xPos;
          rect.y = yPos;

          // We can now split the grid. Note that if our rectangle spans multiple grid
          // cells, we're only splitting the ones where the extents of the rectangle end
          int xFarRightColumn = x + requiredNodes.x - 1;
          grid.InsertColumn(xFarRightColumn, leftOverSize.x);

          int yFarBottomRow = y + requiredNodes.y - 1;
          grid.InsertRow(yFarBottomRow, leftOverSize.y);

          // Once that's done, we'll go over all the required nodes and set them to true
          // so the grid knows we've put a rectangle there.
          for (int i = x + requiredNodes.x - 1; i >= x; i--)
          {
            for (int j = y + requiredNodes.y - 1; j >= y; j--)
            {
              grid.Set(i, j, true);
            }
          }
        }
        xPos += grid.GetColumnWidth(x);
      }
      yPos += grid.GetRowHeight(y);
    }

    if (!done) // failed
      continue;

    rect.was_packed = true;
  }
}
Okay, now we need that CanBePlaced function. This takes the desired node you want to place your rectangle in, and searches to the right and below through all the other cells to make sure that when your rectangle overlaps multiple cells, it will have enough space. You could just check the one candidate cell, but then you’d be losing out on valid space as cells can sometimes be quite small.
bool CanBePlaced(DynamicGrid& grid, Vec2i desiredNode, Vec2i desiredRectSize, Vec2i& outRequiredNodes, Vec2i& outRemainingSize)
{
  int foundWidth = 0;
  int foundHeight = 0;

  // For tracking which cells we're checking in the grid
  // Remember we have to check multiple cells as the rect could span a few cells
  int trialX = desiredNode.x;
  int trialY = desiredNode.y;

  // We're looping over all cells to the right and below to get enough
  // space to fit our rectangle
  while (foundHeight < desiredRectSize.y)
  {
    trialX = desiredNode.x;
    foundWidth = 0;

    // We've run out of space!
    if ( trialY >= grid.rows.size())
      return false;

    foundHeight += grid.GetRowHeight(trialY);
    while (foundWidth < desiredRectSize.x)
    {
      // We've ran out of space in X
      if (trialX >= grid.columns.size())
      {
        return false;
      }

      // Actually check the grid to see if this cell is being used
      if (grid.Get(trialX, trialY))
      {
        return false;
      }

      foundWidth += grid.GetColumnWidth(trialX);
      trialX++;
    }
    trialY++;
  }

  // Another edge case where we fail to find a location
  if ((trialX - desiredNode.x) <= 0 || (trialY - desiredNode.y) <= 0)
    return false;

  // Visited all cells that we'll need to place the rectangle,
  // and none were occupied. So the space is available here.
  outRequiredNodes = Vec2i(trialX - desiredNode.x, trialY - desiredNode.y);
  outRemainingSize = Vec2i(foundWidth - desiredRectSize.x, foundHeight - desiredRectSize.y);

  return true;
}
You can see how the complexity is quickly spiralling out of control here. Simply finding out if we can place a rectangle is nearly as complex as the actual packing algorithm. Anyway, that’s it, we’ve got our grid splitting algorithm. We’re a far cry from the simplicity of the row packer. But hopefully, this gives us the packing ratio of the pixel scanner, but much faster as we no longer need to check all these pixels. Let’s see how it performs with just 25 rectangles.
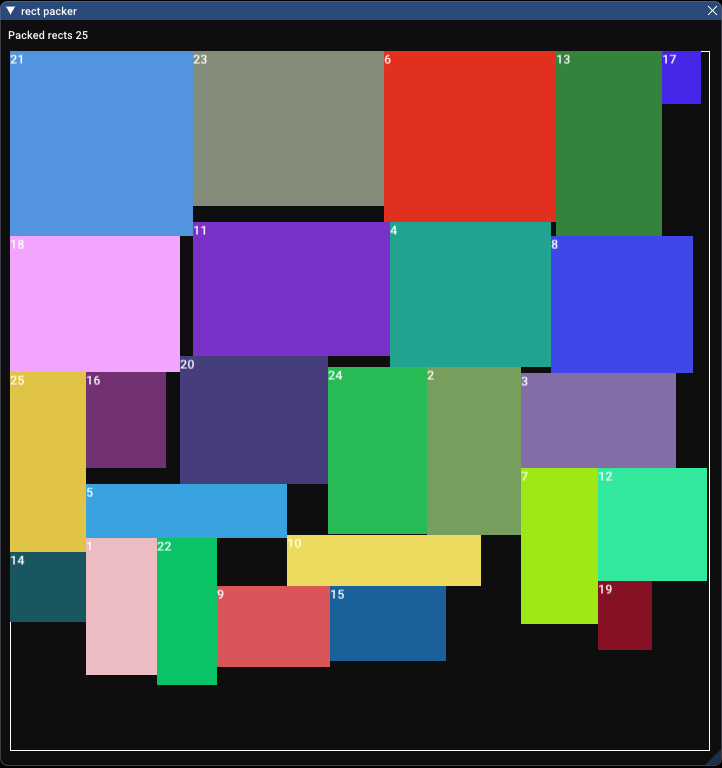
Note that this appears to work best with perimeter packing, so that’s what’s shown above. I’ve not explored exactly why. It’s evidently not exactly like pixel scanning. Anyway, this has a packing ratio of 87.1% and took 1.370 milliseconds. Much faster! That is excellent stuff. It’s not quite as dense as pixel scanning, but it’s better than skyline bottom-left if a lot slower still. We’ll do a more thorough comparison later in the article, but it’s interesting to note that this still does not perform better than our simple row packer. Let’s try it with more rectangles now.
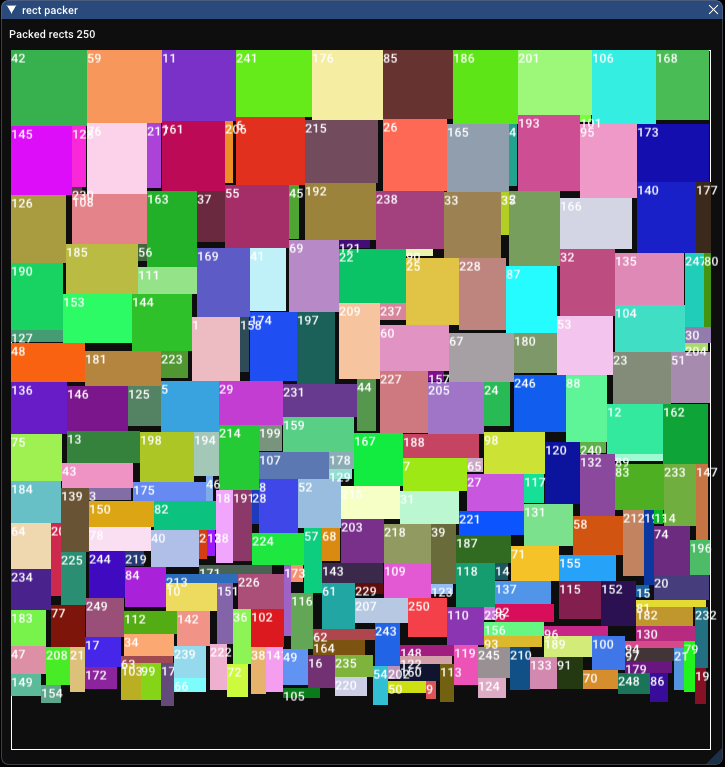
Ah, look at that! Much better. It got a packing ratio of 94.6% (not quite as good as pixel scanning, but very good nonetheless) and took 433.677 milliseconds. The time taken seems to have grown very fast. It’s still faster than pixel scanning, but it’s not even close to our row packer or skyline bottom left. Evidently, the number of grid cells grows very fast and increases complexity.
We’ve now created a much more complicated algorithm, and I can’t stress this enough, I’ve glossed over the problems I encountered implementing this just to keep the article shorter, but this has more edge cases, crashes more often, is harder to debug, harder to modify and extend. The cognitive strain of working with this algorithm is a lot more than anything else we’ve done so far. And at this point, I’m wondering if it’s worth it for something that’s not orders of magnitude faster.
Let’s go back to being simple again shall we?
This is based on another method I found while researching for this article. The idea here is that we represent open spaces in the container with a binary tree. Let me draw a picture

In theory its an extremely simple algorithm. The hope is that it’ll pack more tightly than our prior simple algorithms, but be computationally simpler and take less time to pack.
Let’s take a look at how it works. This particular implementation is based on a library I found on GitHub called rectpack2D, you can see it here and it’s authors explanation of how it works.
One important thing to note about this algorithm is that our list of nodes in the tree only stores open nodes or leaf nodes in the tree. Saves us from iterating over nodes we’ll never be able to use. We also organise the list such that smaller nodes are listed at the end, and we iterate backwards, attempting to use up smaller spaces before moving on to larger spaces when we fail.
Another interesting point to note is that we split the remaining space such as to leave one large empty area, and one smaller empty area. If you take a look at the diagrams above, if we’d made splits in the opposite axis, we’d not be maximizing the space of at least one node. This seems to result in more efficient use of space.
struct Rect
{
  USHORT x, y;
  USHORT w, h;
  bool wasPacked = false;
};

void PackRectsBinaryTree(std::vector<Rect>& rects)
{
  // Sort by area, seemed to work best for this algorithm
  std::sort(rects.begin(), rects.end(), SortByArea());

  struct Node
  {
    int x, y;
    int w, h;
  };
  std::vector<Node> leaves;

  // Our initial node is the entire image
  leaves.push_back({0, 0, 700, 700});

  for (Rect& rect : rects)
  {
    bool done = false;
    // Backward iterate over nodes
    for (int i = (int)leaves.size() - 1; i >= 0 && !done; --i)
    {
      Node& node = leaves[i];

      // If the node is big enough, we've found a suitable spot for our rectangle
      if (node.w > rect.w && node.h > rect.h)
      {
        rect.x = node.x;
        rect.y = node.y;

        // Split the rectangle, calculating the unused space
        int remainingWidth = node.w - rect.w;
        int remainingHeight = node.h - rect.h;

        Node newSmallerNode;
        Node newLargerNode;
        // We can work out which way we need to split by checking which
        //  remaining dimension is larger
        if (remainingHeight > remainingWidth)
        {
          // The lesser split here will be the top right
          newSmallerNode.x = node.x + rect.w;
          newSmallerNode.y = node.y;
          newSmallerNode.w = remainingWidth;
          newSmallerNode.h = rect.h;

          newLargerNode.x = node.x;
          newLargerNode.y = node.y + rect.h;
          newLargerNode.w = node.w;
          newLargerNode.h = remainingHeight;
        }
        else
        {
          // The lesser split here will be the bottom left
          newSmallerNode.x = node.x;
          newSmallerNode.y = node.y + rect.h;
          newSmallerNode.w = rect.w;
          newSmallerNode.h = remainingHeight;

          newLargerNode.x = node.x + rect.w;
          newLargerNode.y = node.y;
          newLargerNode.w = remainingWidth;
          newLargerNode.h = node.h;
        }

        // Removing the node we're using up
        leaves[i] = leaves.back();
        leaves.pop_back();

        // Push back the two new nodes, note smaller one last.
        leaves.push_back(newLargerNode);
        leaves.push_back(newSmallerNode);

        done = true;
      }
    }

    if (!done)
      continue;

    rect.was_packed = true;
}
Ahh, compared to the grid splitter, the simplicity of this is a breath of fresh air! Let’s see how it compares with 25 rectangles.
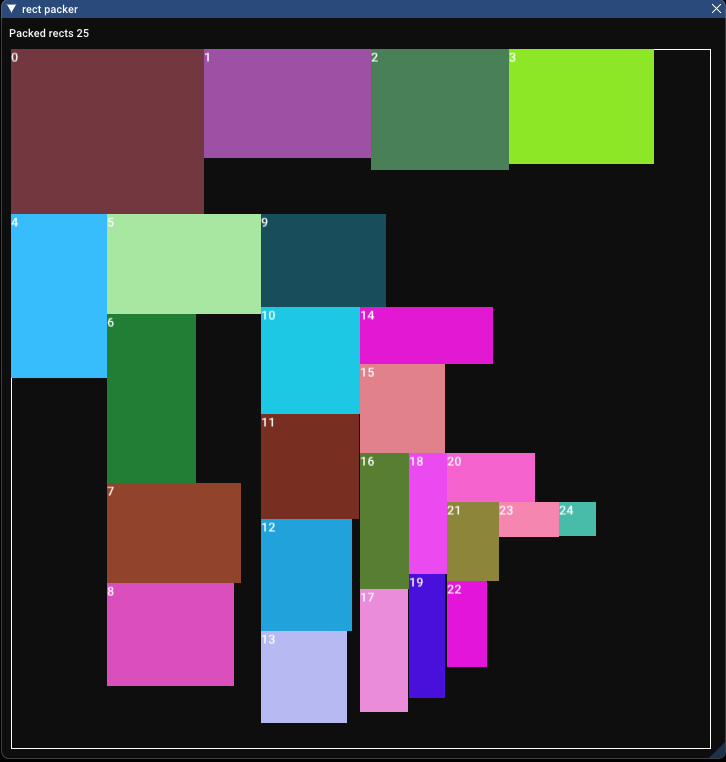
Wow, that’s not very good at all. Packing ratio of 59.7% and time of 0.225 milliseconds. Well, at least it’s fast. Though I think something’s wrong here. After some playing, I realised that due to the way the algorithm splits nodes and puts the smallest at the back, it prefers using the diagonal centre line. Only when it cannot use it any more will it go back to the leaf nodes further away from the centre line. Realising this, the obvious solution is to limit the diagonal centre line so it fills up the edges properly.
Taking the simplest solution, lets just brute force try a few different container sizes until we find a good one. We’ll do a binary search, trying the largest available space first. If everything fits, half it, if that doesn’t work, increase by a quarter, etc until we’ve found the minimum size that fits all the rectangles properly.
Here’s that implementation, it’s just an extra loop around the above algorithm, which I’ve omitted here for brevity.
void PackRectsBinaryTree(eastl::vector<Rect>& rects)
{
  // Sort by a heuristic
  std::sort(rects.begin(), rects.end(), SortByArea());

  std::vector<Node> leaves;

  // We'll start with the biggest available size
  int startSize = 700;
  int size = startSize;
  // Step is how much we'll change our search size in the next iteration
  int step = size / 2;
  // At what step size do we stop searching?
  int giveUpStep = 300;
  bool hasEverSucceeded = false;

  while (step > giveUpStep)
  {
    int numRectsPacked = 0;
    // Reset everything
    for (stbrp_rect& rect : rects)
    {
      rect.x = 0;
      rect.y = 0;
      rect.was_packed = 0;
    }
    leaves.clear();
    leaves.push_back({0, 0, size, size});

    for (Rect& rect : rects)
    {
      // ... Omitted, same code as above, just doing a binary tree pack
      numRectsPacked++;
    }

    if (numRectsPacked < rects.size())
    {
      // We failed to pack all rects
      if (size == startSize)
        break;

      size += step;

      // This ensures that it doesn't succeed, try for smaller bins,
      // and never quite get back up to where it's supposed to be again
      if (step / 2  <= giveUpStep && hasEverSucceeded)
      {
        step += step;
        continue;
      }
    }
    else
    {
      // Succeeded, try a smaller area
      size -= step;
      hasEverSucceeded = true;
    }
    step /= 2;
  }
}
Note that by changing the giveUpStep value we can choose if we want speed or packing efficiency. Give up at a larger step, and we default back to what we had before. Give up at a small step, you get the best packing ratio. Could be quite useful.
Anyway, let’s see how that fairs against the same set of rectangles as above.
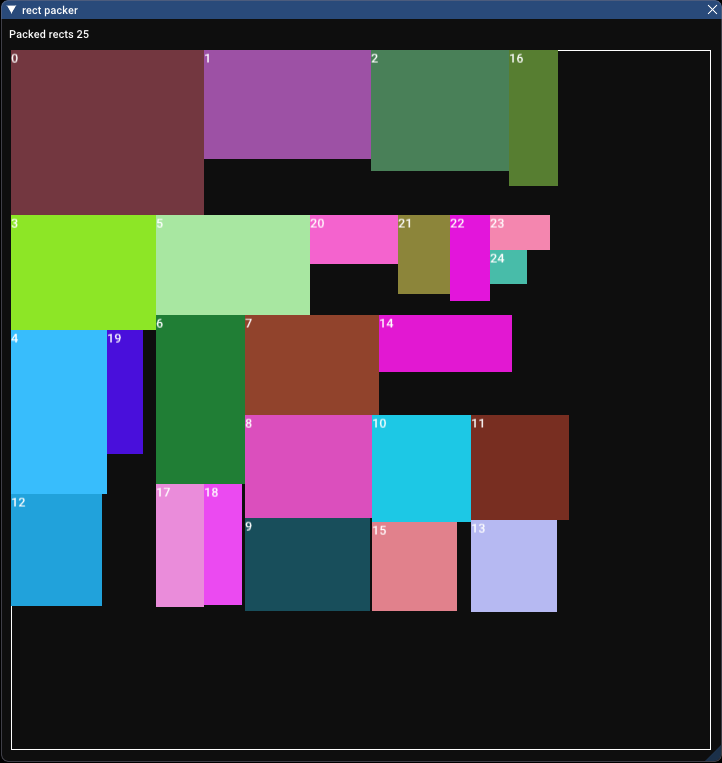
That looks far better! We get a packing ratio of 82.5% and a time taken of 0.478 milliseconds. Didn’t take that much longer to find a good size, and the packing ratio is far improved. This puts it in the realm of the other algorithms. Let’s try with 250 rectangles.
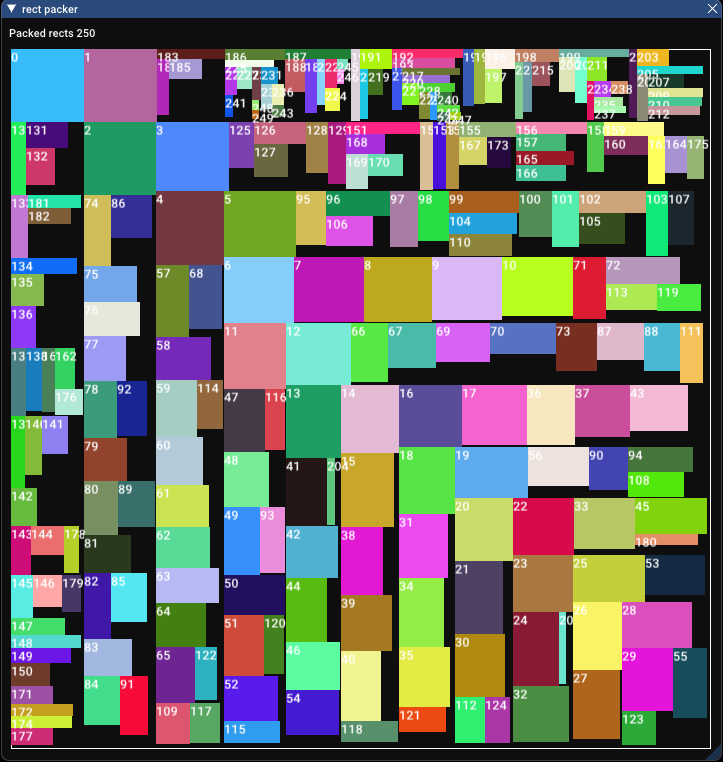
With a packing ratio of 80.5% and a time taken of 0.989 milliseconds, it’s starting to show some weakness here. Performing worse than most other algorithms we’ve tried so far. I think there’s space for us to try one more algorithm to see if we can combine the high packing ratios with good performance.
Before we look at all our results there was something that struck me by this point in this process. What if the set of rectangles is not of uniform randomness. If the standard deviation of heights in rectangles was high, algorithms like the row packer would presumably fair worse, as there would be a lot of wasted space as each height difference was large. This, as you might expect is true.
If we wanted to make a fair comparison of each algorithm then, we should test each algorithm on multiple sets of rectangles with different distributions of shapes. That is what we’ll attempt to do here.
The following results were all done separately to the above experiments, with standard sets of pre-generated rectangles given to each algorithm so randomness does not affect the result between each test.
Each algorithm will be given 6 tests, 2 as before with a uniform distribution of 25 rectangles and then 250. Then the other 4 tests will be a normal distribution with low and high standard deviation, for both 25 and 250 rectangles.
Let’s look at the results, first with packing ratio
| 25, Low SD | 25, High SD | 25, Uniform | 250, Low SD | 250, High SD | 250, Uniform | |
|---|---|---|---|---|---|---|
| stb_rect_pack | 73.90% | 79.30% | 82.60% | 93.90% | 93.80% | 93.10% |
| Row Packing | 81.00% | 67.80% | 79.10% | 91.60% | 85.20% | 92.50% |
| Pixel Scanning | 82.00% | 87.70% | 86.80% | 94.90% | 96.70% | 96.80% |
| Grid Splitting | 83.80% | 85.70% | 86.00% | 92.90% | 95.30% | 95.10% |
| Binary Tree | 80.20% | 69.10% | 82.50% | 82.20% | 84.50% | 80.50% |
Obvious standout here is the pixel scanning algorithm, closely followed by grid splitting. As we expected the row packer also performed great, until we got high standard deviations, and then it started to fall apart.
Looking at the execution times below row packing is the clear winner.
| 25, Low SD | 25, High SD | 25, Uniform | 250, Low SD | 250, High SD | 250, Uniform | |
|---|---|---|---|---|---|---|
| stb_rect_pack | 0.136 | 0.118 | 0.136 | 0.637 | 0.636 | 0.683 |
| Row Packing | 0.118 | 0.16 | 0.185 | 0.223 | 0.266 | 0.218 |
| Pixel Scanning | 297.956 | 277.8 | 208.413 | 863.731 | 1151.761 | 1184.247 |
| Grid Splitting | 1.222 | 1.221 | 1.112 | 554.554 | 426.177 | 595.442 |
| Binary Tree | 0.646 | 0.81 | 0.528 | 1.806 | 1.576 | 2.428 |
From staring at this it becomes apparent that there is no clear cut winner. There are compromises. The pixel scanning and grid splitting algorithms are the best at just getting high packing ratios. But if you want speed, skyline bottom-left is probably the best.
It’s worth noting that although our naive row packer is the fastest in all cases, it fails when you give it varied sets of rectangles. Skyline bottom-left fairs a lot better in these situations. This is presumably why the author of stb_rect_pack chose this algorithm. It’s very fast, and does pretty well in a wide range of situations.
Unfortunately, the binary tree method seems come up a bit short in a lot of test cases. Maybe I’ve missed something, but then again, it’s one redeeming factor is that it’s simple. But you know what’s even simpler? Naive row packing.
I think the moral of this adventure for me is that complexity often isn’t necessary. When I searched for information about this, I repeatedly came to the message of “do what’s obvious, it’s probably enough”. And I think that’s true. I started this wanting to pack font bitmaps. Regularly shaped similarly sized rectangles. I could use the grid splitter, the fastest version of the densest packing method I found. But remember the cost you must pay for that complexity. It’s more code, it’s inclined to have more bugs, it’s harder to reason about and debug. Is it worth the improvement? Simpler algorithms are more predictable, have fewer bugs and are easier to work with. From our above tables, naive row packing is probably the best solution I can get. The test algorithm I started with, the one I never thought would be that good, ends up being the best for my use case.
That about sums it up really. Understand what your problem is, the solution you need almost certainly isn’t that complicated. If it feels too complicated, it is.
I collected a lot of articles, links and papers while researching for this. Here they all are for your adventures.